Eque Help
Getting started
Install Eque from the Mac App Store, turn it on in the welcome window, and allow System Audio Recording when macOS asks.
Install
Eque is on the Mac App Store. It needs macOS 14.2 (Sonoma) or later. It installs no driver or audio device, so there’s nothing to set up and nothing left behind if you delete it.
Turn Eque on
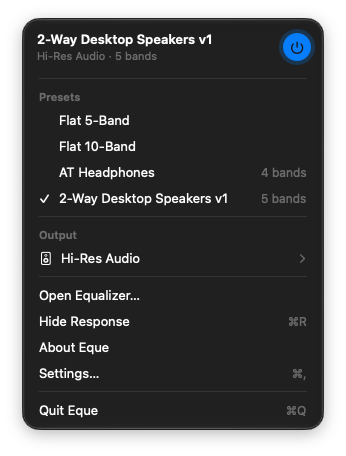
The first time Eque opens, turn it on in the welcome window. After that, the power button in the menu bar panel and in the equalizer window turns the EQ on and off.
Allow “System Audio Recording”
To reach every app’s audio, Eque needs macOS’s System Audio Recording permission. That’s the permission any app needs to process your Mac’s audio. Eque uses it to apply your EQ as sound plays. Nothing is recorded, stored or sent anywhere, and Eque collects no data.
The recording indicator
While the EQ is on, macOS shows a recording indicator in the menu bar. macOS shows it whenever an app processes system audio. With Eque it means the EQ is on. It isn’t your microphone; Eque never uses the microphone.
 menubar-panel.png
Using Eque
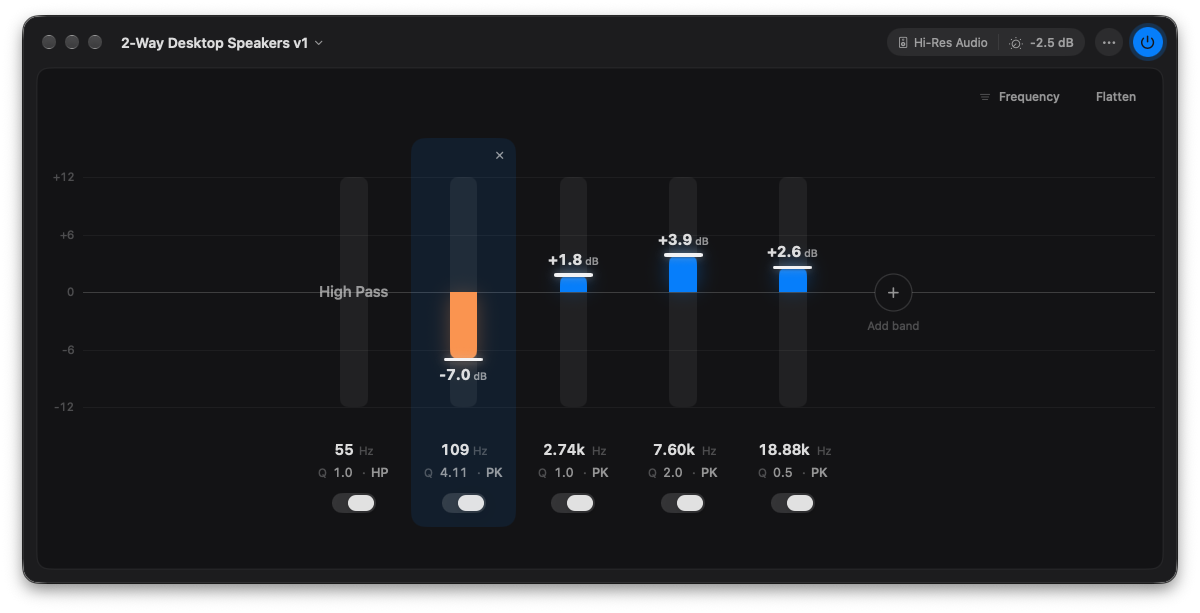
Drag a bar to boost or cut, click a number to type an exact value, and open the Response window with ⌘R to see the curve your bands make.
Bands
Drag a bar to boost or cut. Hold Option for fine control. Click any number to set frequency, gain or Q by typing; press Escape to cancel. ⌘Z takes back any change, even Reset.
Five bands come placed where they matter: low shelf, three peaks, high shelf. Pro adds as many bands as you need, plus low-pass, high-pass and notch filters.
Presets
Switch presets from the menu bar panel or the equalizer window. Flat 5-Band is the starting point. With Pro, Flat 10-Band is a second starting point, and you can save as many presets as you like.
Output and preamp
The equalizer window shows the output Eque is shaping. The preamp control next to it sets the level. With Auto on, the preamp lowers the level by exactly your largest boost, so boosts never clip. An orange dot tells you if anything ever goes over.
Show Response
Choose Show Response from the menu bar panel, or press ⌘R . The Response window shows the exact shape your bands make, side by side with the equalizer. Point at a band in either and it lights up in both.
Analyzer and Both
Switch the Response window to Analyzer to watch what’s playing, before and after your EQ, or to Both to see the curve over the music. Neither is a measurement of your speakers or room.
Colors
Pick the boost and cut colors from a palette of ten, in Settings.
 eq-window.png
Eque Pro
Pro is a one-time purchase of $9.99, with Family Sharing. It is not a subscription.
What Pro adds
| Feature | Free | Pro |
|---|---|---|
| System-wide EQ, menu bar control | ✓ | ✓ |
| Bands | 5 | Unlimited |
| Peak and shelf filters | ✓ | ✓ |
| Low-pass, high-pass and notch filters | — | ✓ |
| Saved presets | 1 | Unlimited |
| Starting points | Flat 5-Band | Flat 5-Band, Flat 10-Band |
| Response window: curve and analyzer | ✓ | ✓ |
| Colors | ✓ | ✓ |
| A curve for each output | — | ✓ |
| Separate left and right EQ | — | ✓ |
| Import AutoEq, REW, Equalizer APO, miniDSP, Sweep | — | ✓ |
| Export presets and impulse responses | — | ✓ |
| Global on/off shortcut | — | ✓ |
Restore Purchase
If you already bought Pro, use Restore Purchase in the Pro sheet or in Settings.
Family Sharing
One purchase, yours to keep, shared with your family through Family Sharing.
Troubleshooting
Most questions come down to the power button, the output shown in the window, or the System Audio Recording permission.
“The EQ does nothing”
Check that the power button is on, and that the output shown in the equalizer window is the one you’re listening on.
“The first moment of sound after a silence plays without the EQ”
When nothing is playing, Eque steps back so your Bluetooth headphones can rest, and picks up again with the next sound. Turn this off in Settings > Pause when nothing plays.
“Bluetooth headphones sound thin on calls”
macOS switches Bluetooth headphones to their call mode during calls. That change is made by macOS, not by Eque.
“I turned the permission off”
Turn it back on in System Settings > Privacy & Security > Screen & System Audio Recording.
“A miniDSP file asks for a sample rate”
Enter the sample rate the file was designed at.
Contact
Questions, problems or ideas: carlsieber@mac.com